Blog

Fujifilm X100S and Sony A7 Comparison

With my X-Pro1 out of commission and my X-T1 headed back to B&H because of the light leak issue, I thought I would shake things up a bit by renting the Sony A7 and FE 35mm f/2.8 lens. To make things even more interesting, I decided to compare the Sony A7/35mm lens combo with the Fujifilm X100S. Not a scientific comparison based on sharpness and resolution, but more of a real world comparison based on how and what I shoot.  

Each pair of images below were shot back to back with me standing in the same place. I also tried to compose each pair of images to be identical, but this turned out to be much more difficult than I anticipated. All the images were shot in RAW and then processed using Lightroom 5 and VSCO Film 04. While I didn't use the same VSCO preset for all the images, I did use the same Fuji and Sony variations of the selected preset for each pair of images. 

X100S - 1/640 seconds at f/2 (ND on)

X100S - 1/60 seconds at f/8

X100S - 15 seconds at f/8

X100S - 1/60 seconds at f/8

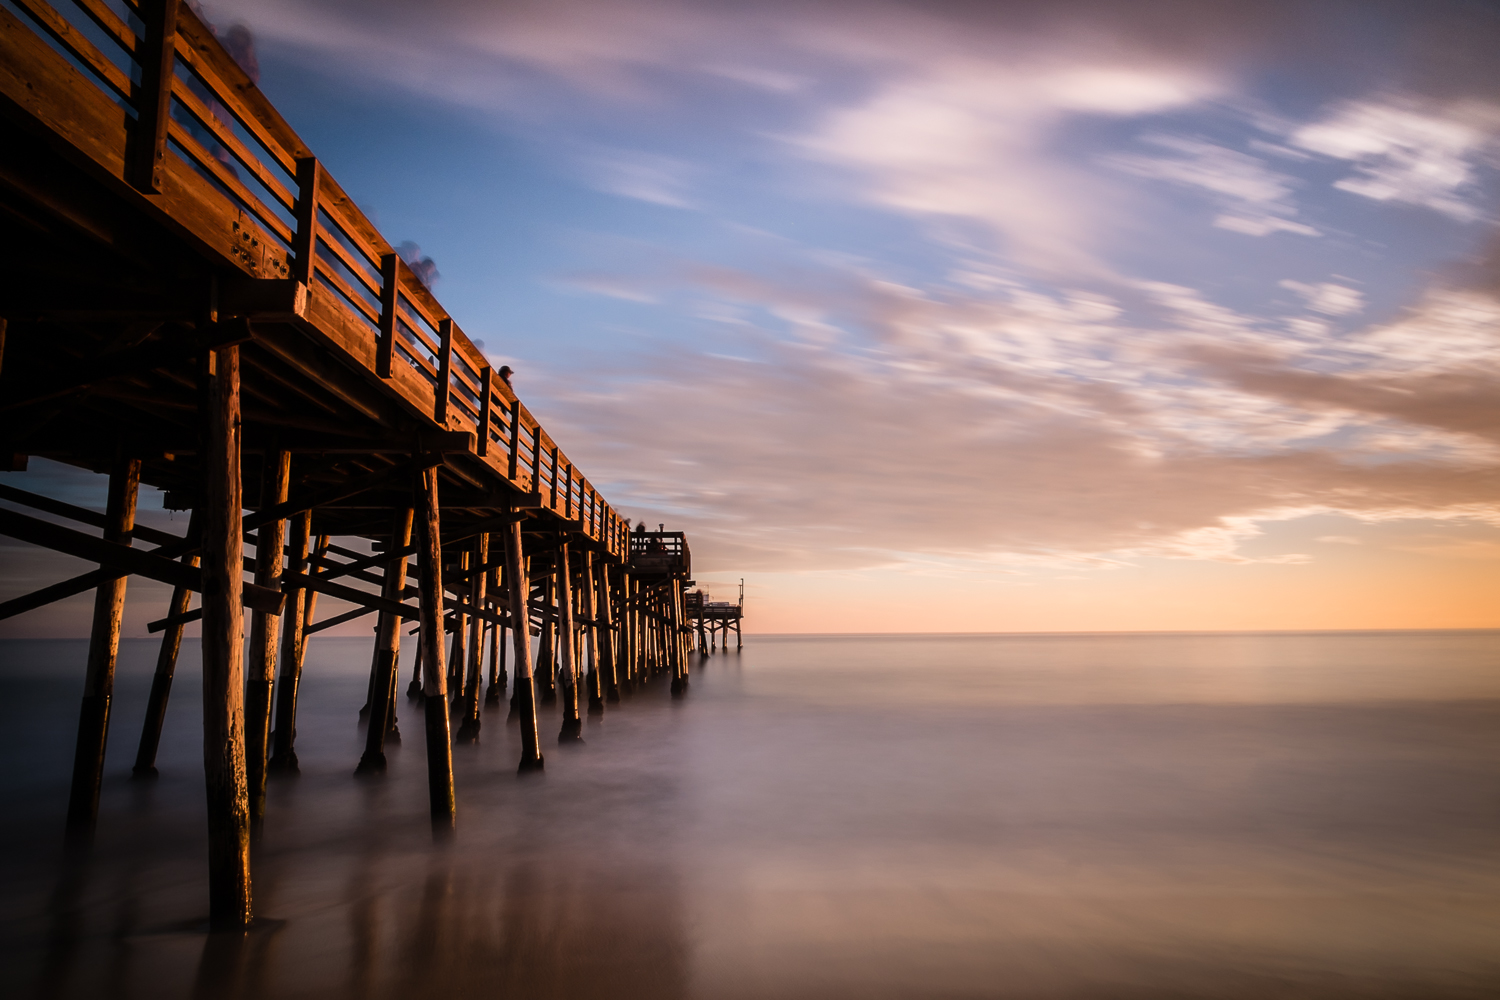
X100S - 58 seconds at f/8

A7 - 1/2000 seconds at f/2.8

A7 - 1/80 seconds at f/8

A7 - 10 seconds at f/8

A7 - 1/60 seconds at f/8

A7 - 30 seconds at f/8

As you can see, there are noticeable differences between each pair of images. Most notably the white balance selected by each camera's auto white balance meter. This is especially apparent in the final pair of images. The other difference is more subtle, but expected. And that is the slight difference in field of view due to the 23mm lens on the X100S versus the 35mm lens mounted on the A7. While both setups yield a 35mm full-frame equivalent focal length, the wider lens on the X100S does result in a bit more of the scene being captured within the frame.

So what conclusions have I drawn from this comparison? Mainly that for how and what I shoot, the APS-C sensors on the X100S and X-Pro1/X-T1 are good enough. Based on the results of my completely unscientific comparison and the fact that I rarely make large prints, I really can't find any reason to consider a move to Sony. It's not that the Sony A7 (and A7R which I haven't used) aren't great cameras. It's just that for my needs and preferences, the Fuji X Series cameras and lenses simply suit me better.

Long Exposures with the Lee Seven5 System

I added the Lee Seven5 filter system to my long exposure photograph kit in October of 2013. Previously, I used round Neutral Density (ND) filters that screwed on to the front of my lenses. While these filters worked well for extending exposure times, I found myself struggling to get them off my lenses whenever I needed to refocus or recompose my shots. This problem was even more apparent when I was using a round 10 stop ND filter because I had to take it off to recompose nearly every shot. 

Having used the Lee Seven5 system extensively, I wanted to share my thoughts on using it with my Fuji X series cameras. For those unfamiliar with the Lee Seven5 system, it consists of a filter holder that can hold two filters at a time, various resin and glass filters, and adapter rings with thread sizes between 37mm and 72mm. There is also a circular polarizer and lens hood available. The items I purchased included the filter holder, the 10 stop Big Stopper, the 3 stop (0.9) soft edge grad ND, and the 58mm and 49mm adapter rings. I use the 58mm adapter ring with my XF 14mm lens and XF 35mm lens (requires a 52 to 58mm step up ring) and the the 49mm adapter ring with my X100S. While there is an adapter ring designed for the X100 and X100S, I opted for the regular 49mm adapter ring because it works with the adapter ring I use for attaching a UV filter and the Fujinon Wide Conversion Lens I rent periodically. 

Here are a few images of the Lee Seven5 system mounted on the X-Pro1 and XF 14mm lens.

As you can see, the system is relatively compact. This is because Lee designed the Seven5 system to be used with compact system cameras like the X-Pro1 and X100S. By reducing the filter width to 75mm, they were able to reduce the size of the filter holder and the other accessories as well. 

To give you an idea of how the filters can change the look of your images, here are three images I shot at the Newport Beach Pier using the system. 

X-Pro1 with XF 14mm - 1/8 seconds at f/8 (no filters)

X-Pro1 with XF 14mm - 1/8 seconds at f/8 (no filters)

X-Pro1 with XF 14mm - 1/8 seconds at f/8 (3 stop grad ND filter)

X-Pro1 with XF 14mm - 1/8 seconds at f/8 (3 stop grad ND filter)

X-Pro1 with XF 14mm - 180 seconds at f/8 (3 stop grad ND filter and 10 stop ND filter)

X-Pro1 with XF 14mm - 180 seconds at f/8 (3 stop grad ND filter and 10 stop ND filter)

The three images were shot one after another and only minor adjustments were made in Lightroom. From the last image, you can see that the 10 stop Big Stopper shifts the white balance and causes some vignetting with the XF 14mm lens. Having used a round 10 stop ND filter in the past, I can tell you that these issues are not specific to the Lee Big Stopper. For this reason, I almost always shoot in RAW when using ND filters because it lets me fix these issues easily in Lightroom.

Another potential issue to be aware of is caused by the white letters on the front of the Fujinon lenses. When using the Lee Seven5 system with the XF 14mm lens, I have seen reflections of the white letters show up in my images. This, in my opinion, is more problematic because it is much harder to fix after the fact. To deal with this problem, I have used black gaffer tape to cover the white letters on the front of all my lenses, including the X100S. 

Overall, I am really impressed with the Lee Seven5 system. Everything I have purchased is well designed and well constructed. While using the system does require me to carry a few more items, I think the benefits make it worthwhile. The ability to easily slide the filters in and out means fewer dropped filters and the ability to use graduated ND filters means less blown out skies. Since there are alternatives which require less of an investment, I can't recommend the Lee Seven5 system to everyone. But for those that want to move past traditional round ND filters, I think the Lee system is a good option to consider.

Chasing Clouds with the X-Pro1

This weekend was a good reminder of the importance of being flexible, especially in long exposure photography. I set off Saturday afternoon to photograph Arch Rock in Corona del Mar and to test out a Fujinon XF 60mm I purchased a couple weeks ago. When I got to Corona del Mar, the skies in the area were completely overcast making the conditions less than ideal for shooting long exposures. As I looked out over the water and contemplated heading home, I noticed that the clouds over Newport Beach showed much more promise. So with an hour before sunset, I jumped back into my car and headed towards Newport Beach. As I made my way towards Newport Beach, I thought that the cloudy skies would make a good backdrop for the Balboa Pier. Upon arriving, I abandoned the idea of testing out the XF 60mm and switched to the XF 14mm so I could capture the pier along with all the details in the sky.

Here are three of my favorite long exposure images from a Newport Beach sunset that I nearly missed all together. For all three of these, I used my XF 14mm and Lee Seven5 system which consists of a Big Stopper 3.0 ND and a Soft-Edge 0.9 Grad ND.

90 seconds at f/16

90 seconds at f/16

85 seconds at f/8

85 seconds at f/8

180 seconds at f/11

180 seconds at f/11

Catching Waves

Often times, I go out knowing what I want to shoot and how I want to shoot it only to return with something completely different. This was the case last weekend when I went down to Newport Beach to make some long exposure photographs of the Balboa Pier. I arrived at the pier Saturday morning only to find the area already full of summer visitors. I took a detour down to the end of Balboa Peninsula and walked back along the beach towards the pier. While walking, I turned my attention to the ocean and started making images of the huge waves crashing along the beach. I have always been fascinated by the breaking of waves and I ended up spending the morning creating photographs that could convey the movement and power of the ocean. While the photographs turned out completely different than what I set out to make, they did give me an idea for a new project. Here are three of my favorites from this recent outing.

Rework with Silver Efex Pro

Since I didn't an opportunity to shoot this week, I spent some time reworking one of my photographs posted a couple weeks back of the Newport Pier using Silver Efex Pro 2. The original image I posted was converted and edited using Lightroom 4. Since I shot the original image in raw, I started by converting it to black and white using the Red Hi-Contrast Filter preset in Lightroom. From there, I made the normal tonal adjustments using the Basic panel and finished by applying a Graduated Filter to the top, left, and bottom of the image. I did this instead of applying a vignette because I wanted to darken the edges slightly without completely losing the blacks in the pier. 

Newport Pier original

To compare the results from Lightroom and Silver Efex Pro, I created a Virtual Copy of my original image and reset all the adjustments I made except for cropping. I then opened the image in Silver Efex Pro from Lightroom and applied the Full Contrast and Structure preset. Of all the available presets, this one seems to be my favorite so far. As you can see in the screenshot, the image quickly took on a very different look from what I created in Lightroom.

After applying the preset, I did some fine tuning using the Brightness, Contrast, and Structure sliders available in the right pane and used the Burn Edges adjustment to slightly darken the edges.

Newport Pier in Silver Efex Pro 2

Here's the final image from Silver Efex Pro. Comparing the two outputs, they're obviously very different. But that has more to do with the edits I applied and less to do with the tools I used. I've been using Lightroom for years so I have a good idea of what I can and can't do. Since I've only been using Silver Efex Pro for a couple weeks, it'll take some time to get my workflow down. Seeing and comparing the results from both tools, I can imagine lots of possibilities when using the two together and look forward to many, many more images created using this combination.

Newport Pier rework