Blog

Long Exposures with the Lee Seven5 System

I added the Lee Seven5 filter system to my long exposure photograph kit in October of 2013. Previously, I used round Neutral Density (ND) filters that screwed on to the front of my lenses. While these filters worked well for extending exposure times, I found myself struggling to get them off my lenses whenever I needed to refocus or recompose my shots. This problem was even more apparent when I was using a round 10 stop ND filter because I had to take it off to recompose nearly every shot. 

Having used the Lee Seven5 system extensively, I wanted to share my thoughts on using it with my Fuji X series cameras. For those unfamiliar with the Lee Seven5 system, it consists of a filter holder that can hold two filters at a time, various resin and glass filters, and adapter rings with thread sizes between 37mm and 72mm. There is also a circular polarizer and lens hood available. The items I purchased included the filter holder, the 10 stop Big Stopper, the 3 stop (0.9) soft edge grad ND, and the 58mm and 49mm adapter rings. I use the 58mm adapter ring with my XF 14mm lens and XF 35mm lens (requires a 52 to 58mm step up ring) and the the 49mm adapter ring with my X100S. While there is an adapter ring designed for the X100 and X100S, I opted for the regular 49mm adapter ring because it works with the adapter ring I use for attaching a UV filter and the Fujinon Wide Conversion Lens I rent periodically. 

Here are a few images of the Lee Seven5 system mounted on the X-Pro1 and XF 14mm lens.

As you can see, the system is relatively compact. This is because Lee designed the Seven5 system to be used with compact system cameras like the X-Pro1 and X100S. By reducing the filter width to 75mm, they were able to reduce the size of the filter holder and the other accessories as well. 

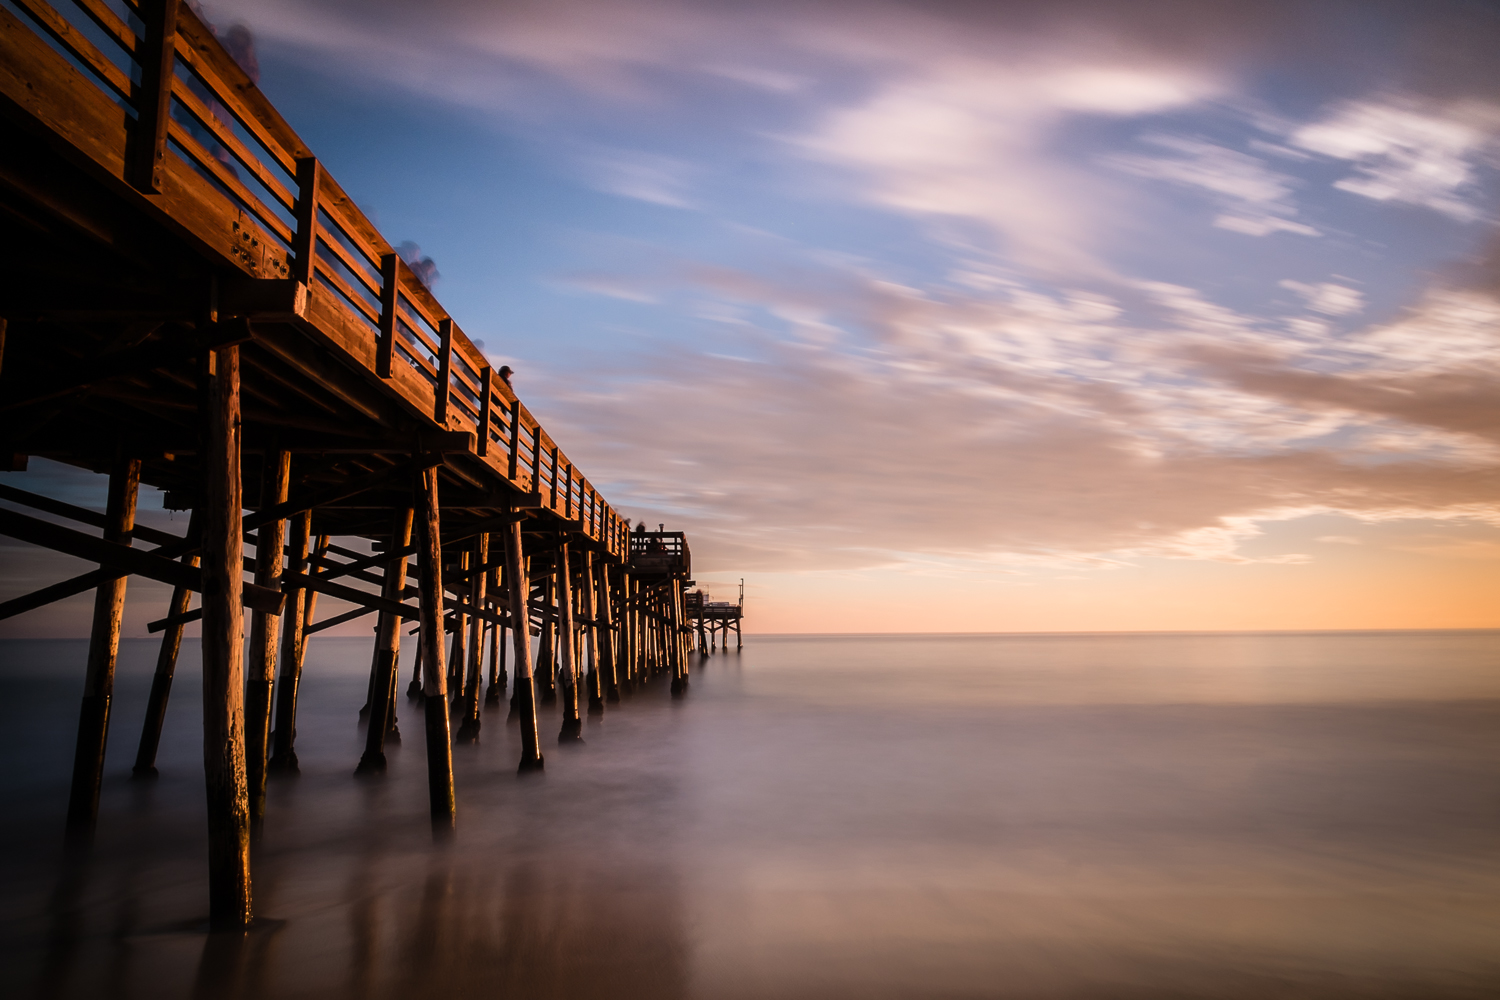
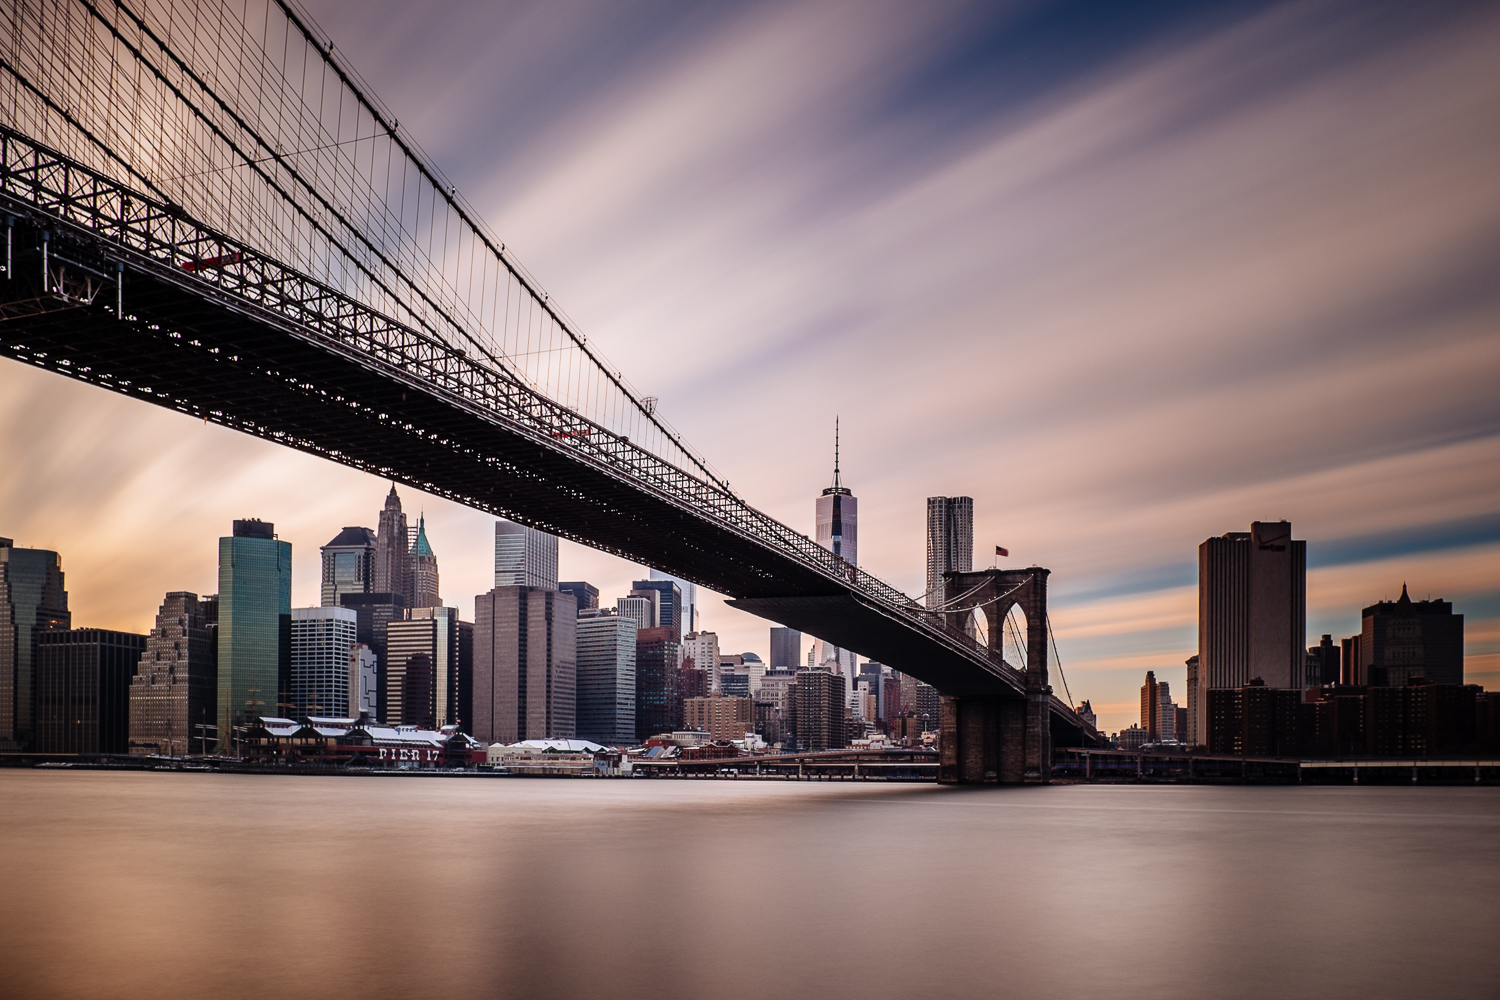
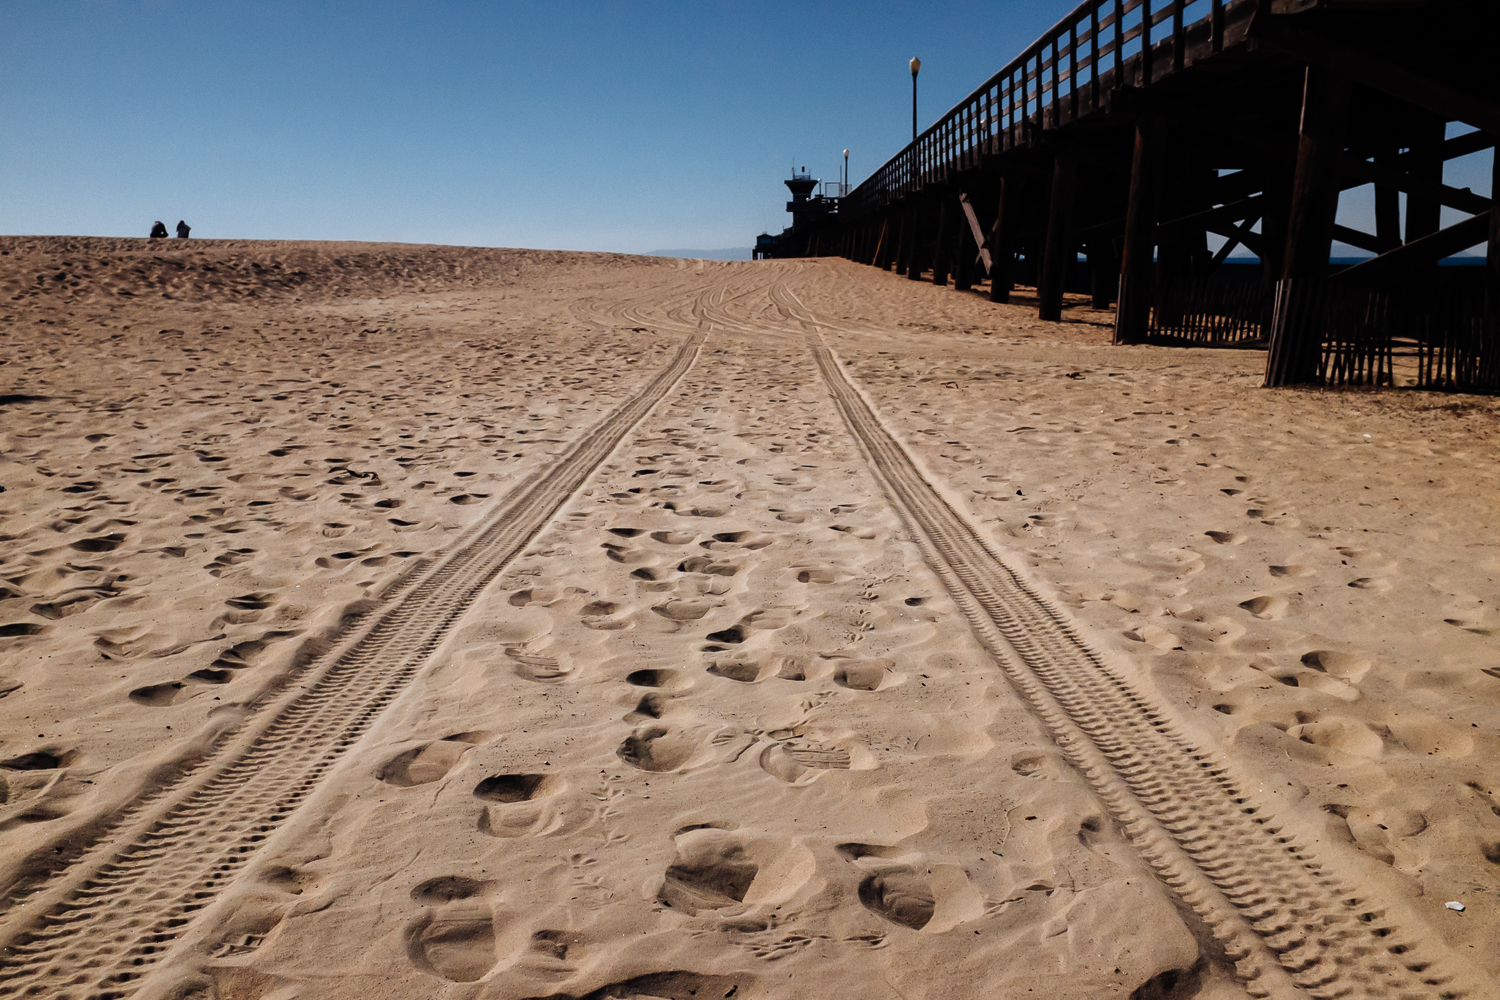
To give you an idea of how the filters can change the look of your images, here are three images I shot at the Newport Beach Pier using the system. 

X-Pro1 with XF 14mm - 1/8 seconds at f/8 (no filters)

X-Pro1 with XF 14mm - 1/8 seconds at f/8 (no filters)

X-Pro1 with XF 14mm - 1/8 seconds at f/8 (3 stop grad ND filter)

X-Pro1 with XF 14mm - 1/8 seconds at f/8 (3 stop grad ND filter)

X-Pro1 with XF 14mm - 180 seconds at f/8 (3 stop grad ND filter and 10 stop ND filter)

X-Pro1 with XF 14mm - 180 seconds at f/8 (3 stop grad ND filter and 10 stop ND filter)

The three images were shot one after another and only minor adjustments were made in Lightroom. From the last image, you can see that the 10 stop Big Stopper shifts the white balance and causes some vignetting with the XF 14mm lens. Having used a round 10 stop ND filter in the past, I can tell you that these issues are not specific to the Lee Big Stopper. For this reason, I almost always shoot in RAW when using ND filters because it lets me fix these issues easily in Lightroom.

Another potential issue to be aware of is caused by the white letters on the front of the Fujinon lenses. When using the Lee Seven5 system with the XF 14mm lens, I have seen reflections of the white letters show up in my images. This, in my opinion, is more problematic because it is much harder to fix after the fact. To deal with this problem, I have used black gaffer tape to cover the white letters on the front of all my lenses, including the X100S. 

Overall, I am really impressed with the Lee Seven5 system. Everything I have purchased is well designed and well constructed. While using the system does require me to carry a few more items, I think the benefits make it worthwhile. The ability to easily slide the filters in and out means fewer dropped filters and the ability to use graduated ND filters means less blown out skies. Since there are alternatives which require less of an investment, I can't recommend the Lee Seven5 system to everyone. But for those that want to move past traditional round ND filters, I think the Lee system is a good option to consider.

First Long Exposures with the Fujifilm X-T1

Since the Fujifilm X-T1 was announced in January, I've been on the fence about purchasing one to replace my X-Pro1. As much as I like the X-Pro1, the fall it took in September last year seems to be slowly taking its toll. After considering my options, I went ahead and ordered the X-T1 kit which includes the XF 18-55mm lens.

My X-T1 arrived Friday and this past weekend, during a break in the rain, I took it along with the XF 18-55mm to Huntington Beach to shoot a few long exposures. After one morning of shooting, here are my first impressions on using the X-T1 for long exposure photography.

The Good

The Images - no surprise here since the X-T1 uses an updated version of the X-Pro1 sensor which is also in the X100S. I haven't processed any RAW files yet since they aren't supported in Lightroom, but the JPEGs are typical Fuji.

The Viewfinder - I'll be honest, I was a little underwhelmed by the new electronic viewfinder at first. Perhaps, my expectations were too high because of all the glowing reviews I had read. Once I put it to use at Huntington Beach however, I started to see and understand what all the fuss was about. In good light, the viewfinder along with all its new technology is really something to behold. Since I often focus manually when shooting long exposures, the new dual screen display made checking focus much easier. Especially now that I can set the focus peaking color to red, what a difference!

The Tilting LCD - this is definitely a nice addition. Not something I needed, but it really does help when shooting on a tripod. I found the display a little dim when I was composing in bright sunlight, perhaps I should've adjusted the brightness setting. In any case, I ended up using the EVF when this was the case so having both options was a big plus.

The ISO Dial - on the X-Pro1 and X100S, I leave Auto ISO on unless I'm shooting long exposures. To make things faster and easier, I program one of the custom settings on both cameras to set my ISO to 200. With the X-T1, this wasn't necessary since it can now be done with the turn of a dial. The locking ISO dial works for me because I don't need to change my ISO very often or very quickly. For those that need to change ISO frequently, the lock button on the ISO dial may slow things down a bit.

The Bad

The Buttons - by far, my biggest complaint about the X-T1 are the buttons, especially those on the 4-way directional pad. They are too recessed and don't provide enough feedback to know when they've been pressed. I understand that changes were probably necessary to accommodate weather sealing, but these are the buttons many people use the most. I now find the task of changing my AF point to be a more difficult and slower process. While this isn't a deal breaker for me because my subjects tend to be stationary, it may be for those that need to change their focus point quickly.

The Threaded Shutter Button - or lack there of, most likely another trade off to accommodate weather sealing. This won't matter to some, but for anyone that wants exposure times exceeding 30 seconds, a $50 remote from Fuji is now required (at least until something cheaper comes along).

The Bottom Line

As you can see, the good for me outweighs the bad. While the X-T1 isn't perfect, it does offer several improvements for long exposure photography over the X-Pro1. The biggest ones being the new EVF and tilting LCD. Are these must have improvements, not by any means. But since I was in the market for a new camera, they are certainly welcomed.

My recommendation to anyone considering the X-T1 as an upgrade from the X-Pro1 or X-E1/2 is to try it out in the store first. While the new EVF really is great, it may not be enough to warrant an upgrade. Especially if you are using an X-E2 which already has the updated X-Trans sensor found in the X-T1.

With that, I'll leave you with my first long exposure images from Huntington Beach shot with the X-T1 and XF 18-55mm.

3.2 seconds at f/11

3.2 seconds at f/11

9 seconds at f/16

9 seconds at f/16

12 seconds at f/22

12 seconds at f/22

17 seconds at f/22

17 seconds at f/22

9 seconds at f/22

9 seconds at f/22

Chasing Clouds with the X-Pro1

This weekend was a good reminder of the importance of being flexible, especially in long exposure photography. I set off Saturday afternoon to photograph Arch Rock in Corona del Mar and to test out a Fujinon XF 60mm I purchased a couple weeks ago. When I got to Corona del Mar, the skies in the area were completely overcast making the conditions less than ideal for shooting long exposures. As I looked out over the water and contemplated heading home, I noticed that the clouds over Newport Beach showed much more promise. So with an hour before sunset, I jumped back into my car and headed towards Newport Beach. As I made my way towards Newport Beach, I thought that the cloudy skies would make a good backdrop for the Balboa Pier. Upon arriving, I abandoned the idea of testing out the XF 60mm and switched to the XF 14mm so I could capture the pier along with all the details in the sky.

Here are three of my favorite long exposure images from a Newport Beach sunset that I nearly missed all together. For all three of these, I used my XF 14mm and Lee Seven5 system which consists of a Big Stopper 3.0 ND and a Soft-Edge 0.9 Grad ND.

90 seconds at f/16

90 seconds at f/16

85 seconds at f/8

85 seconds at f/8

180 seconds at f/11

180 seconds at f/11

NYC Long Exposures with the Fujinon WCL-X100

Having rented the Fujinon WCL-X100 Wide Conversion Lens for our trip to New York, I thought I would use it for a few long exposures during an afternoon visit to the Dumbo area in Brooklyn. As the sun began to set, I set up the X100S, conversion lens, and a 10 stop ND filter to shoot the Brooklyn and Manhattan bridges. The good thing about the conversion lens is that the filter thread is the same size as the X100S. This meant that I didn't have to buy an additional step up ring to use my ND filter. The bad thing is that you need to tell the camera the lens is mounted to get the right Exif data. Not a huge deal, but I did find myself constantly forgetting to switch this setting on and off during our trip. Aside from that though, I have no complaints about the Wide Conversion Lens. My images shot using it were all plenty sharp and the wider angle of view, while subtle, really helped for capturing these iconic New York City bridges.

Brooklyn Bridge - 125 seconds at f/8

Brooklyn Bridge - 125 seconds at f/8

Manhattan Bridge - 58 seconds at f/11

Manhattan Bridge - 58 seconds at f/11

Brooklyn Bridge Sunset - 28 seconds at f/11

Brooklyn Bridge Sunset - 28 seconds at f/11

Simplicity and the X100S Part 2

As I've mentioned in the past, the X100S is the camera I turn to whenever I want to keep things simple. Without having to worry about zooming or changing lenses, I'm left to focus on creating images. By concentrating on what I see in the viewfinder, I find that I'm not only more creative with my compositions, but more able to find a narrative in the images I bring home. Here is a series of images from my latest exercise in simplicity.